redux-saga runAllEffect 에러 해결하기

클론코딩을 하던 중 이런 에러를 마주하였다.

스크롤을 내려보면 runAllEffect에서 발생한 에러임을 알 수 있다.
TypeError: Cannot read property ‘forEach’ of null

runAllEffect 에러

해결방안

액션을 구독할 때에 take함수를 쓰는데, import를 해주지 않아서 발생한 에러였다. take를 import 해주었다.
자바스크립트라 어이없는 실수가 많다..

1
2
3
4
5
6
7
8
9
10
11
12
13
14
15
16
17
18
19
20
21
22
23
24
25
26
27
28
29
30
31
32
33
34
35
36
37
38
39
40
41
42
43
44
45
46
47
48
import { all, delay, fork, take } from "redux-saga/effects";

// function logInAPI(data) {
// return axios.post("/api/login");
// }

function* logIn(data) {
try {
// const result = yield call(logInAPI, action.data);
yield delay(1000);
yield put({
type: "LOG_IN_SUCCESS",
data: action.data,
});
} catch (err) {
yield put({
type: "LOG_IN_FAILURE",
data: err.response.data,
});
}
}

function* logOut() {
try {
yield delay(1000);
yield put({
type: LOG_OUT_SUCCESS,
});
} catch (err) {
console.error(err);
yield put({
type: LOG_OUT_FAILURE,
error: err.response.data,
});
}
}

function* watchLogIn() {
yield take("LOG_IN_REQUEST", logIn);
}

function* watchLogOut() {
yield take("LOG_OUT_REQUEST", logOut);
}

export default function* userSaga() {
yield all([fork(watchLogIn), fork(watchLogOut)]);
}
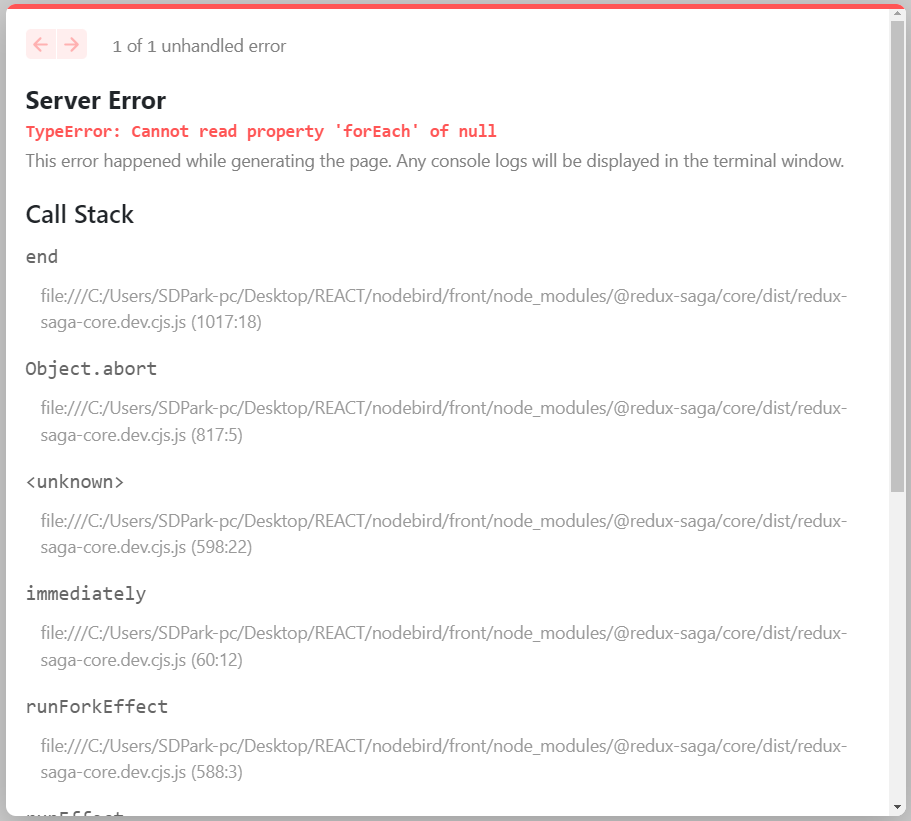
Server Error TypeError: Cannot read property 'forEach' of null

This error happened while generating the page. Any console logs will be displayed in the terminal window.
Call Stack
end
file:///C:/Users/SDPark-pc/Desktop/REACT/nodebird/front/node_modules/@redux-saga/core/dist/redux-saga-core.dev.cjs.js (1017:18)
Object.abort
file:///C:/Users/SDPark-pc/Desktop/REACT/nodebird/front/node_modules/@redux-saga/core/dist/redux-saga-core.dev.cjs.js (817:5)

file:///C:/Users/SDPark-pc/Desktop/REACT/nodebird/front/node_modules/@redux-saga/core/dist/redux-saga-core.dev.cjs.js (598:22)
immediately
file:///C:/Users/SDPark-pc/Desktop/REACT/nodebird/front/node_modules/@redux-saga/core/dist/redux-saga-core.dev.cjs.js (60:12)
runForkEffect
file:///C:/Users/SDPark-pc/Desktop/REACT/nodebird/front/node_modules/@redux-saga/core/dist/redux-saga-core.dev.cjs.js (588:3)
runEffect
file:///C:/Users/SDPark-pc/Desktop/REACT/nodebird/front/node_modules/@redux-saga/core/dist/redux-saga-core.dev.cjs.js (1208:7)
digestEffect
file:///C:/Users/SDPark-pc/Desktop/REACT/nodebird/front/node_modules/@redux-saga/core/dist/redux-saga-core.dev.cjs.js (1275:5)

file:///C:/Users/SDPark-pc/Desktop/REACT/nodebird/front/node_modules/@redux-saga/core/dist/redux-saga-core.dev.cjs.js (677:5)
Array.forEach

runAllEffect
file:///C:/Users/SDPark-pc/Desktop/REACT/nodebird/front/node_modules/@redux-saga/core/dist/redux-saga-core.dev.cjs.js (676:8)

React로 NodeBird SNS 만들기 3 리덕스 적용하기

재 밌 다!

재밌어서 색상을 바꾸고 강조해보았다(div태그 이용).
오랜만에 리액트를 만지니까 재밌다.
오늘은 프로젝트에 리덕스를 적용하였다.
next에는 redux를 적용할 수 있도록 도와주는 고마운 라이브러리가 있다.
또한 기존의 redux와 달리 라이브러리에서 자동으로 provider로 감싸주기 때문에 provider로 감싸지 않아도 된다.

설치하기

라이브러리들을 설치해준다.

1
2
3
npm i next-redux-wrapper로 설치
npm i redux
npm i react-redux

리듀서 작성하기

먼저 루트 디렉터리에 reducer 폴더를 만든다.

위 reducer 폴더에 user.js파일을 만들고 개요를 작성해준다.

1
2
3
4
5
6
7
8
9
10
11
12
13
14
15
16
17
18
19
20
21
22
23
24
25
26
27
28
29
30
31
32
33
34
35
36
37
38
39
40
41
42
export const initialState = {
isLoggedIn: false,
user: null,
signUpData: {},
loginData: {},
};

export const loginAction = (data) => {
return {
type: "LOG_IN",
data,
};
};

export const logoutAction = () => {
return {
type: "LOG_OUT",
};
};

const reducer = (state = initialState, action) => {
switch (action.type) {
case "LOG_IN": {
return {
...state,
user: action.data,
isLoggedIn: true,
};
}
case "LOG_OUT": {
return {
...state,
user: null,
isLoggedIn: false,
};
}
default:
return state;
}
};

export default reducer;

마찬가지로 reducer 폴더에 post.js파일을 만들고 개요를 작성해준다.

1
2
3
4
5
6
7
8
9
10
11
12
export const initialState = {
mainPosts: [],
};

const reducer = (state = initialState, action) => {
switch (action.type) {
default:
return state;
}
};

export default reducer;

마지막으로 해당 경로에 index.js파일을 만들고
리듀서들을 합쳐준다.
HYDRATE는 서버사이드 랜더링을 위한 것이라고 한다.

1
2
3
4
5
6
7
8
9
10
11
12
13
14
15
16
17
18
19
20
import { HYDRATE } from "next-redux-wrapper";
import user from "./user";
import post from "./post";
import { combineReducers } from "redux";
const initialState = {};

const rootReducer = combineReducer({
index: (state = {}, action) => {
switch (action.type) {
case HYDRATE:
return { ...state, ...action.payload };
default: {
return state;
}
}
},
user,
post,
});
export default rootReducer;

스토어 만들기

루트 디렉토리에 store폴더를 만들고 configureStore.js 파일을 작성해준다.
redux devtools또한 적용하였다.
개발모드일 때랑 배포모드일 때 미들웨어를 다르게 하였다.
마지막으로 래퍼를 생성해 반환한다.

1
2
3
4
5
6
7
8
9
10
11
12
13
14
15
16
17
18
19
20
import { createWrapper } from "next-redux-wrapper";
import { applyMiddleware, compose, createStore } from "redux";
import reducer from "../reducers";
import { composeWithDevTools } from "redux-devtools-extension";

const configureStore = () => {
const middlewares = [];
const enhancer =
process.env.NODE_ENV === "production"
? compose(applyMiddleware(...middlewares))
: composeWithDevTools(applyMiddleware(...middlewares));
const store = createStore(reducer, enhancer);
return store;
};

const wrapper = createWrapper(configureStore, {
debug: process.env.NODE_ENV === "development",
});

export default wrapper;

적용하기

가장 상위 파일인 app.js를 다음과 같이 감싸준다.
그러면 라이브러리에서 provider로 자동으로 감싸준다.

1
2
3
4
5
6
7
8
9
10
11
12
13
14
15
16
17
18
19
20
21
22
import PropTypes from "prop-types";
import "antd/dist/antd.css";
import Head from "next/head";
import wrapper from "../store/configureStore";

const App = ({ Component }) => {
return (
<>
<Head>
<title>NodeBird</title>
<meta charSet="utf-8" />
</Head>
<Component />
</>
);
};

App.propTypes = {
Component: PropTypes.elementType.isRequired,
};

export default wrapper.withRedux(App);

사용하기

기존 redux와 동일하게 useSelector, useDispatch를 사용할 수 있다.

React로 NodeBird SNS 만들기 2 redux-saga

리덕스에 비동기 작업들을 처리하는 리덕스 사가를 사용해보자!
본 게시글은 next.js +redux + redux-saga기준으로 작성하였다.

설치

1
npm i redux-saga

Store에 적용하기

Store를 만들고 미들웨어를 추가해준다.
그 후 반환 전 사가 미들웨어를 실행해준다.

1
2
3
4
5
6
7
8
9
10
11
12
13
14
15
16
17
18
19
20
21
22
23
import { createWrapper } from "next-redux-wrapper";
import { applyMiddleware, compose, createStore } from "redux";
import reducer from "../reducers";
import { composeWithDevTools } from "redux-devtools-extension";
import createSagaMiddleware from "redux-saga";

const configureStore = () => {
const sagaMiddleware = createSagaMiddleware();
const middlewares = [sagaMiddleware];
const enhancer =
process.env.NODE_ENV === "production"
? compose(applyMiddleware(...middlewares))
: composeWithDevTools(applyMiddleware(...middlewares));
const store = createStore(reducer, enhancer);
store.sagatask = sagaMiddleware.run(rootSaga);
return store;
};

const wrapper = createWrapper(configureStore, {
debug: process.env.NODE_ENV === "development",
});

export default wrapper;

제너레이터

중단점이 있는 함수이다 next()를 통해 다음 중단점 전까지 실행한다.
return된 값은 value에 저장된다.
saga에서는 이벤트 리스너로 활용한다.

1
2
3
4
5
6
7
8
9
10
11
12
13
const func = function* () {
console.log(1);
yield;
console.log(2);
yield;
console.log(3);
yield;
};

func; //func{<suspended>}
func.next(); //1 {value:undefined,done:false}
func.next(); //2 {value:undefined,done:false}
func.next(); //3 {value:undefined,done:true}

saga에서의 제너레이터 적용

1
2
3
4
5
6
7
8
9
10
11
12
13
14
15
16
17
18
19
20
21
22
23
24
25
26
function* logIn(action) {
try {
const result = yield call(logInAPI, action.data);
yield put({
type: "LOG_IN_SUCCESS",
data: result.data,
});
} catch (err) {
yield put({
type: "LOG_IN_FAILURE",
data: err.response.data,
});
}
}

function* watchLogIn() {
yield take("LOG_IN_REQUEST", logIn);
}

function* watchLogOut() {
yield take("LOG_OUT_REQUEST");
}

export default function* rootSata() {
yield all([fork(watchLogIn), fork(watchLogOut)]);
}

saga 이펙트

sagas/index.js에 이펙트를 작성하였다.

all

  • 배열안의 함수를 동시에 실행한다
1
2
3
export default function* rootSata() {
yield all([fork(watchLogIn), fork(watchLogOut)]);
}

fork

  • 매개변수로 받은 함수를 비동기 실행하는 함수이다.
1
2
3
export default function* rootSata() {
yield all([fork(watchLogIn), fork(watchLogOut)]);
}

call

  • 매개변수로 받은 함수를 동기 실행하는 함수이다.
  • call(함수,매개변수1,매개변수2,…)의 형식으로 호출해주어야 한다.
  • 아래 함수의 경우 call 아래줄은 500ms동안 지연이 일어난 후에 실행된다.
1
2
3
4
function* handleInput(input) {
// 500ms마다 지연
yield call(delay, 500);
}

take

  • 해당 액션이 실행될 때 까지 기다리는 함수이다.
  • LOG_IN_REQUEST 액션 발생시 logIn함수를 실행한다.
1
2
3
function* watchLogIn() {
yield take("LOG_IN_REQUEST", logIn);
}

put

  • store에게 dispatch하는 이펙트이다.
  • saga 미들웨어가 실행된 store에 전달한다.
1
2
3
4
5
6
7
8
9
10
11
12
13
14
function* logIn(action) {
try {
const result = yield call(logInAPI, action.data);
yield put({
type: "LOG_IN_SUCCESS",
data: result.data,
});
} catch (err) {
yield put({
type: "LOG_IN_FAILURE",
data: err.response.data,
});
}
}

saga에서의 제너레이터 적용

  • 액션별로 함수를 지정해주고 액션이 발생시 그 함수를 호출해준다.
    이펙트 앞에는 yield를 붙여주어야 보장된다.

  • rootSaga에서 해당 이벤트가 발생시 핸들러에게 action을 같이 넘긴다.
    기존 redux와 같이 action.data, action.type로 이벤트 타입과 같이 넘겨진 데이터에 접근할 수 있다.

1
2
3
4
5
6
7
8
9
10
import { all, fork, take, call, put } from "redux-saga/effects";
import axios from "axios";

function logInAPI(data) {
return axios.post("/api/login", data);
}

function* watchLogOut() {
yield take("LOG_OUT_REQUEST");
}

기타 saga 이펙트

take

  • 일회용이다. 한 번 이벤트를 받으면 사라진다.
  • while로 감싸 계속 사용할 수 있다.
1
2
3
4
5
function* watchLogOut() {
while (true) {
yield take("LOG_OUT_REQUEST");
}
}

takeEvery

  • 계속해서 사용할 수 있다.
  • while문을 대체할 수 있고, while문은 동기적으로 동작하지만 takeEvery는 비동기적으로 동작한다.
1
2
3
function* watchLogOut() {
yield takeEvery("LOG_OUT_REQUEST");
}

delay

  • 해당 시간동안 대기한다.
1
2
3
function* watchLogOut() {
yield delay(1000); //1초 대기
}

debounce

  • 연이어 호출되는 함수들 중 마지막 함수만 호출되도록 한다. 호출스택의 제일 윗부분의 요청이 실행되면 값이 task에 저장되어 나머지가 전부 cancel된다.

delay 이용

1
2
3
4
5
6
7
8
9
10
11
12
13
14
15
function* handleInput(input) {
// 500ms마다 지연
yield call(delay, 500)
...
}
function* watchInput() {
let task;
while (true) {
const { input } = yield take("INPUT_CHANGED");
if (task) {
yield cancel(task);
}
task = yield fork(handleInput, input);
}
}

takeLatest 이용

  • 마지막 요청만 인식하여 한 번만 실행한다.
1
2
3
4
5
6
7
8
9
10
11
12
import { delay } from 'redux-saga'

function* handleInput({ input }) {
// 500ms마다
yield call(delay, 500)
...
}

function* watchInput() {
// 현재 실행중인 handleInput 작업을 취소합니다.
yield takeLatest('INPUT_CHANGED', handleInput);
}

throttle

  • 마지막 함수가 호출된 후 일정 시간이 지나기 전에 다시 호출되지 않도록 한다.
1
2
3
4
5
6
7
function* handleInput(input) {
// ...
}

function* watchInput() {
yield throttle(500, "INPUT_CHANGED", handleInput);
}

ref

https://mskims.github.io/redux-saga-in-korean/recipes/

React로 NodeBird SNS 만들기 1

인프런에서 제로초(조현영)님이 진행하시는 React로 NodeBird SNS 만들기을 보고 따라해보기로 했다.

이전에 한 번 진행하였던 과정인데, node+react 기반의 풀스택 프로젝트 경험이 필요하여 진행하게 되었다.

매일매일 조금씩 진행해볼 예정이다.

시작하기 전에 몇 개의 원칙을 정하였다.

원칙

  1. 프로젝트에 git flow 적용하기
  2. 개선점을 찾아 개선해보기
  3. 짧게라도 계속해서 기록으로 남기기( 다만 공식문서를 보고 알 수 있는 내용은 배제)

사용된 라이브러리

폴더 구조는 다음과 같다.
page구조

  1. components

    여러 컴포넌트들을 정의하였다.

    레이아웃의 공통부분인 AppLayout.js을 정의하고 이를 각 페이지에서 받아와서 썼다.

  2. pages

    클론코딩에는 next.js가 사용되었다.
    next.js는 js 프레임워크인 리액트의 프레임워크이다.
    즉 js 프레임워크의 프레임워크이다.
    때문에 여러 편리한 기능들을 제공한다.

    next js는 루트폴더의 pages라는 폴더 내부의 파일명으로 spa를 만든다.
    나는 front 페이지에서 next를 설치하고 작업하였다.

    page구조

    pages/index.js파일은 현재 경로에 아무것도 없을 때 실행된다.

    1
    2
    3
    4
    5
    6
    7
    8
    9
    10
    11
    import AppLayout from "../components/AppLayout";

    const Home = () => {
    return (
    <AppLayout>
    <div>Hello, Next!</div>
    </AppLayout>
    );
    };

    export default Home;

    pages/_app.js파일은 여러 파일에 공통적인 부분들을 적는 파일이다.
    index.js에서 export된 내용들이 props.Component로 들어온다.
    next에서 제공하는 Head 태그를 사용하여 head태그를 수정하였다.

    1
    2
    3
    4
    5
    6
    7
    8
    9
    10
    11
    12
    13
    14
    15
    16
    17
    18
    19
    20
    21
    import PropTypes from "prop-types";
    import "antd/dist/antd.css";
    import Head from "next/head";

    const App = ({ Component }) => {
    return (
    <>
    <Head>
    <title>NodeBird</title>
    <meta charSet="utf-8" />
    </Head>
    <Component />
    </>
    );
    };

    App.propTypes = {
    Component: PropTypes.elementType.isRequired,
    };

    export default App;

    나머지 파일들은 /파일명 으로 접근할 수 있다.

생각난 개선점

  1. Head 태그
    next에서 제공하는 Head 태그를 이용하여 여러 meta 태그들을 직접 다루어보고 적용해주고 싶다..!

  2. Login Form에 라이브러리 적용하기
    react-hook-form과 같은 validation 라이브러리를 적용하여 안정성을 더하고 싶다.

  3. 시멘틱 태그 적용하기
    구현이 어느정도 되었을 때의 이야기지만, 시맨틱 태그를 적용하여 검색엔진에 쉽게 걸리도록 하고 싶다.

  4. typescript 적용하기
    (이건 온전히 내 타입스크립트 실력을 위해서) 아직 타입스크립트가 낯설다 ㅠ
    특히 제네릭을 사용하는 부분은 거의 외워서 작성하게 된다.
    연습을 위해 타입스크립트를 적용해보아야겠다..! 이것도 나중에!

  5. BEM 적용하기
    BEM 네이밍 방식의 연습을 위해 컴포넌트 wrapper에는 styled-components를 사용하고 아래에는 BEM네이밍 방식을 적용할 생각이다.

느낀점

예전에 했을 때는 진짜 따라가기에 벅찼는데, 지금 다시 해보니 새로운 부분들이 많이 보인다.
최대한 열심히 많은 것을 얻어갈 수 있도록 진행해보아야겠다!